Monday, December 16, 2013

Lighted Snow Village


This month I got to work with the Off The Page Project for December over at My Creative Scrapbook !
Pam sent me a Bag Full of Snow Village Pink Paislee Products along with other items to decorate these cute little Village Houses made out of light weigh chipboard. Below is a Peek at all the Goodies...
Here are a few items I added from my stash...Also Not shown is the Die from Tim Holtz -Christmas Carolers. 
Close up of the village set. They come to you flat and all the folds are already there and you just have to decorate them and glue them together.

To get started I used some paint to coat the edges . I did this as my paper would not go over the seam and I did not want the chipboard color to show. You can use any paint you like. Here I used Americana (light mocha)
Note : The following directions are used to do each house. Only the decorations on the houses is different and this can be to your liking..
In the kit there was a pack of Pink Paislee goodies. I picked out all the vellum pieces to use behind my windows as I had plans on putting lights in the houses and want the light to show through when turned on. I did this to all 5 houses. I just adhered the vellum to the inside of the windows as shown below.

Next I took the pattern paper that I wanted to use for this particular house and traced the chipboard shape before cutting out.Then I cut the traced piece on each fold.
This is what the cutout pieces looked like.I also inked each piece with Tim Holtz distress ink.
Then I adhered each piece on the chipboard house.Then make the box form and added liquid Glue to hold in place to form the house.
This Is How I did the roof. I used a circle punch (this can be any size just keep in mind the smaller the more you need the bigger the less you need) I folded each circle in half and adhered one side to the roof and I did this by staggering all the circle pieces going across and starting back on the next row.
For this roof I added a doily from my statsh and cut it in half . I added a piece to each side as shown.
Then I cut a strip of card stock and used a Martha Stewart boarder punch on both sides of the strip for the center of the roof.
Now I decorated each house .
Here I added a bow, some of the diecuts flowers and a spray from my stash that I cut in pieces and used through the village. Then added a bead trimming around the window.
Below is a fe close up pictures on how I added the decor. 
I also Used a snowflake punch throughout the village as well..
Every village is a decorated a little different so I will show you a close up of each one.


Pam had asked me to show how I made the pond in my snow village in case anyone wanted to try it there selves. 
First I got some Blue cardstock (the shade you want) and cut it in the shape of a pond.
 Then I inked the edges with distress ink. This was my man's idea.He says when the water is low you can see the dirt on the edges. I had to make dirt on the edges...
 Then I used crackle accents all in the pond. Remember you must apply it kinda thick not thin so it can crackle and have the gloss look of water.Below is a close up of the water.

Very Fun Project !!! Thanks Pam!


Friday, December 13, 2013

Joy, Love, Peace Layout Tutorial

Here is a walk through of how I have created my layout titled                                              Joy, Love, Peace. 
First I matted on brown card stock a piece of  inked pattern paper .I added it to the top of white cardstock which was used as my base..
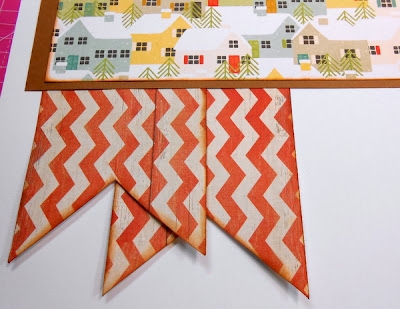
 Using another piece of pattern paper I made banners of all sizes and tucked them in one corner as shown.I Inked these with Distress Ink.
Next I grouped together some of the dye cut pieces from the kit in the corner of the matted banner.( Note: Doily was from my stash you can get these anywhere)
Then Using the stickers in the kit  I made my title staggered as shown..
I loved the banners in the kit and wanted to use them on this layout so I cut them in pieces and added two different styles on top each other on each side of the page.
Now on the Right hand side of the title I wanted to add another grouping so I added more die cuts from the kit and some stickers.
After doing so I decided I wanted more size banners in my grouping above so I cut out more using the same paper and then embellished them by adding Liquid Pearls to them. I also inked each one with distress Ink.
Then I punched a few snow flakes from a EK Success Punch and added it in a few places near my groupings..

Now you are done and can tuck in any photo you would like to add. Here is my finish layout..


Wednesday, December 4, 2013

Reminder !!!!!!!! Our Holiday Give a Gift - Get a Gift Sale

                     My Creative Scrapbook Holiday Give a Gift-Get a Gift Sale!! 

Your Christmas lists are so long, let us help. Do you have a friend or relative that has always wanted a My Creative Scrapbook kit! Well now is the time to give them that special gift! Go ahead, get yourself a gift too!! 

For a limited time we are offering: Our Holiday Give a Gift - Get a Gift Sale! For the first time ever you can purchase one month of our My Creative Scrapbook  Kit Club as a gift or buy a subscription and receive our Holiday Surprise Pack full of paper crafting Goodies Free!!  If you buy multiple subscriptions you get a Holiday Surprise Pack for each new subscription you buy in the month of December!! Let us know where you want the kits and Holiday Surprise Packs mailed and hurry as this Sale ends soon! 
Click HERE and put one month in message box at check out. Any new subscription or orders will receive the holiday surprise pack! The Holiday kits photos will be up on the site on December 5th but sign up now to have a kit held for you. 

Happy Holidays from My Creative Scrapbook!  
Any questions e-mail us at MyCreativeScrapbook@gmail.com

Not Done Yet!!!

If you liked the last post you will love this one.. This months Main Kit  From My Creative Scrapbook was so Fun to play with. We got to play with some Simple Stories Tis the Season.. Fun Fun Stuff!!
Here is what you get in this Kit...


Kit Contents: 
  • Simple Stories Dec. 25th Element sticker
    Tis the Season ABC Element sticker
  • papers 12x12 double sided
    Day of Christmas Reflections
    Special Delivery tis the season
    Simple stories Be Merry
    25 days
    Holiday Holly
    Magical Time
    Peace and Joy
    Holiday Stripe
    Dashing Reindeer
    Seasonal Ornaments
  • Doodle Bug Sequin Package
    Black ABC sticker sheet
  • Petaloo Pointsettias flower pkg
  • Simple Stories Chipboard sheet
  • Oct afternoon holiday badges
  • Oct. afternoon trim wrap package
  • bunch green roses
  • Green and red ribbon
    Black and white polka dot ribbon

Here is what I created using this Kit...


Beautiful Bright and Cherry Kit! You know you want one! Who can resit some Simple Stories... Be Sure to check out the Design Team Gallery The Girls Rocked these Kits and there are plenty Inspiration layouts cards and more to get your creative Juices flowing..... Ho Ho Ho...

Oh I just love Christmas!!!

If you feel the same way you are gonna love this month's Kits over at My Creative Scrapbook!!!
This month we have some Pink Paislee Snow Village in the LE Kit! Yummy!


Content:
  • Pink Paislee Snow Village
    12x12 double sided papers
  • Butter Rum
    Hot Cocoa
    Fruitcake
    Peppermint Patty
    Eggnog
    Gingerbread Man (2)
  • Websters papers
    Magical Day
    Countdown
    Holiday Decor
  • 12x2 Snow Village sticker element sheet
  • Snow village
  • Banner pkg
  • ephemera die cut pack
  • chip board elements
  • canvas elements
  • Prima gold flowers
  • Prima Red and white jeweled flowers
  • Petaloo textured element flowers
  • Gold edged ribbon
    cream satin ribbon
Here is what I created with the Kit.....


Hop on over and get your kit today.... You can even give a one time kit as a Gift. Go Here for Details...

LinkWithin

Related Posts with Thumbnails